Friday, October 12, 2012

Just a Quickie - I Have a Thing for Light Fixtures

Almost all of my projects become projects because I'm too cheap to spend the money and buy anything brand new. I’d much rather find a way to make something myself than buy it. A long time ago I had a friend who told me to quit admitting to everyone how cheap I am. She said I should be embarrassed to say it out loud and I should just say that I'm frugal.

Well, I suppose that sounds better, but bottom line is…I'm cheap.
There. I said it and I feel no shame or embarrassment whatsoever.

It seems as though the barrel shade has made a comeback. Gone are the days of the long seventies style barrel shade. Today’s version is short and sleek. A while ago I updated a lamp in my living room with a linen barrel shade and it gave the lamp just the lift it needed.

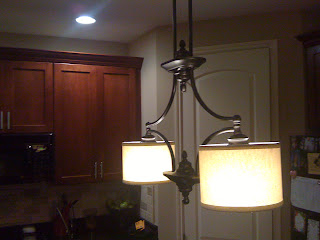
One day while perusing the lighting aisle at Lowes (I have a thing for lighting) I noticed they had linen mini-barrel replacement shades for pendant lights. So of course that inspired a project. What could my love of Rust-Oleum Oil Rubbed Bronze Spray Paint and the newly discovered linen barrel pendant shades mean to me? Kitchen light fixture makeover of course!?!? Why? No reason!

The fixtures I had were fine. There was nothing wrong with them at all. I actually think they were quite nice. They came with the house and I'm sure you can buy something similar at Home Depot or Lowes today. I guess I just wanted a fresh updated look.

Below is a before picture of the light over my kitchen table and one of the light over the island. These are horrible pictures, but of course I didn't think about taking before pictures until after hubby took the lights down. As a matter of fact, I think I already spray painted them when the notion occurred to me to snap a photo. Thankfully, I found some pictures that featured the lights in the shot.

By the way, this is yet another project hubby shook his head and said "you’re going to do what"? Luckily, he just just took the lights down for me and didn’t give me a hard time. Mind you, this was going to save him some money, it's no wonder he didn't put up that much of a fuss. Mike Richardson, Richardson Family CFO likes to save a buck. That’s for sure!


Kitchen Table Light

Island Light

In order to find enough shades for both lights I had to go to three different Lowes stores. Of course it couldn’t be easy! I couldn’t just find all five at the same location, could I? But it was too late, I had my target in sight, I did what I had to do in order to get my hands on those shades!

I took the fixtures apart, ditched the glass shades and went to town spray painting everything in sight with my favorite paint. 

After letting them dry overnight, hubby hung them up for me, I added the mini barrel shades and viola! LOVE them!


The shades were $12.98 each and I used almost a whole can of spray paint which cost $5.77. Are you kidding me? Two updated light fixtures under $75.00? Not bad!

This was a super quick and really easy project that totally updated the room. All I have to do now is update the light over the sink.

~Sheila

If you enjoyed this article, get email updates by entering your email address in the follow by email box.
 If you are viewing this on a cell phone, please go to the web version to enter your email address.

Tuesday, October 2, 2012

Time Underestimated - Faux Wood Garage Doors

After we moved into our new house a few years ago, I wanted to have real wood garage doors installed. Well...I didn't get them, it turns out they are really, really, really expensive. But, I wanted them. So, I found a tutorial online on how to paint faux wood doors. That was it! The seed had been planted, this was now on my to-do list of projects and I couldn't forget about it. I was determined. About a month ago, I finally had the opportunity to start this project. So, I was off to the local Sherwin Williams store with my paint colors picked out, my printed tutorial in hand, and tons of excitement to start this grand project. When I started telling the man behind the counter about my plans, I felt it going south pretty quickly. The more I was excited about what I was going to do, the more he explained the impossibility of the whole project. He explained how difficult it is to do faux painting and that I would probably not be able to do it as the average DIY'er has a hard time.

...Enter doubt stage left...

I ended up leaving the store that day without the paint and enough self doubt to bring me to the belief that I was not going to be able to execute this beautiful door I had pictured in my mind. Shortly after we got into the car, boy did my husband get the worst of it! I was happy to let him know that the man behind the counter did not understand my skill level. I was furious that he would even suggest that I would not be able to pull this off. Didn't he know who he was talking to? I can make anything! Just ask my 10 year old daughter! How dare he??? By the time we got home, I was mad enough to want to prove him wrong. I WILL DO THIS GARAGE DOOR AND I WILL SUCCEED! I went back to the same store a week or so later and I kept my mouth shut. I ordered my paint, waited patiently until it was mixed and quietly left with renewed excitement.
This is how it started...

Step one was to paint the entire door a base coat color called Tatami Tan. This is where the neighbors had to be excited. The best way to describe this color is... hmmm...peach! Ok, maybe a caramel colored peach. After I painted the base coat, the next step was to tape off vertical grain areas. This was a very important step as it gave the illusion of perfectly mitered joints.
Below is what the neighbors were left with at the end of Day 1. WOWZA!

The next day I got up bright and early and ready to finish this project off! Yay me! Let's do this!
It was at this moment that I seriously underestimated the amount of time I needed to complete this project. After 8 hours of carefully taping each panel, painting each vertical grain with a layer of brown called java, then a mixture of java and black, I had to call it a day. I was exhausted.
The neighbors had to be really excited now. I actually had one guy come down to find out exactly what I was doing because he wanted to make sure I wasn't painting my doors peach. Um...yeah...ok buddy... get some landscaping, then come talk to me about my garage doors!

This is how Day 2 finished up.

You can tell from this photo, darkness had fallen... I painted the bottom row so that hopefully my neighbors would see where I was going with this monstrosity.

Monday came as it always does and my project had to wait until after work. It's fall here in Michigan, so I was racing against the clock for both sunshine and decent weather. I was still excited about my project though, so I was back at it as soon as I got home from work until darkness forced me inside.

After two weeks of this relentless schedule and life creeping in here and there, the excitement started to diminish. I can't believe how long it is taking me to do these doors!

I completed this project yesterday, but not without cursing this door the entire day. I just wanted to be done. I questioned over and over and over again, why I started such an enormous project.
And then...
I stepped back...
snapped my photo...
and there it was, everything I had pictured in my head.
My wood garage door.
I did it!
Take that Sherwin Williams guy!
How ya like me now???????


Excited and overjoyed, I said to my husband "what do you think? Do you like it?" His response: "Are you going to do the front door now?"
We'll see...I can't even think about it right now... we'll see.
~Sheila


If you enjoyed this article, get email updates by entering your email address in the follow by email box.
 If you are viewing this on a cell phone, please go to the web version to enter your email address.